
Back in the 2000’s, playing videos on a web page was truly a mess. The audience needed to install plugins such as RealPlayer, or just cross fingers while waiting for the video to show up inside a Windows Media Player canvas. YouTube has proven us that Adobe Flash was great for it’s time to stream media. Since then, embedding videos became a less painful task than ever.
Today, the HTML5 specification allows us to embed a video on a web page, like if we want to embed a picture.
<video width="640" src="video.webm"></video>
But the URL specified inside the src attribute must lead to a complete video
file. What if we’d want to stream a video by directly injecting it’s binary
data right inside the player, just like that ?
According to the MDN website, the src attribute supports the RTMP
protocol, which was used by Adobe Flash to stream videos on YouTube. That
wasn’t enough for my graduation project involving video streaming over a
peer-to-peer network between web browsers.
// Because I was looking for something THAT simple...
var player = document.getElementById('player');
var data = new Uint8Array([0x1F, 0x6B, ...]);

player.appendBytes(data);
Create a Media Source object
The HTML5 Media element does not provide a way to do it directly. YouTube uses
the Media Source Extensions (MSE) API to replace the behavior of their old
flash video player. It simply takes the place of the file URL as the src
attribute on your <video> element and gives you the possibility to inject the
media’s data like that:
var mediaSource = new MediaSource();
mediaSource.addEventListener('sourceopen', mediaSourceOpen);

var player = document.getElementById('player');
player.src = window.URL.createObjectURL(mediaSource);
Add a Source Buffer
Your video’s src attribute has been replaced with a generated URL, the web
browser will no longer try to retrieve the video file remotely, but it will
listen to the attached Source Buffers instead. These buffers are appended to
the Media Source object and filled with binary data from the video we want to
stream. A Source Buffer must be created upon initialization by telling which
media format and codecs we’re going to use.
var sourceBuffer;

function mediaSourceOpen() {
  var data = new Uint8Array([0x1F, 0x9A, 0x3B, ...]);
  var mimeType = 'video/webm; codecs="vorbis,vp9"';

  sourceBuffer = mediaSource.addSourceBuffer(mimeType);
  sourceBuffer.appendBuffer(data);
}
Find the right data
The video should play, but it doesn’t. Everything here is correct, except the most important thing: the data we are transmitting. You might expect that we could just split the video file as we want, but if you take a look at the Media Source Extensions specification, you’ll notice that this API is very fragile and will break on the first mistake it will find inside the data you’ll transmit.
Our Source Buffer will take two kinds of data as input:
- Initialization Segment, the first slice of video we have to send, this tells our player about the video resolution, duration, bitrate, …
- Media Segment, the next slices containing the images and audio data to play.
These segments must be structured accordingly to the MSE Byte Stream Format Registry. Only a few media formats and audio/video codecs are supported. We will work with the WebM media format as it’s more used and easier to work with than the MP4 one, which I will write about later in another post.
Encode the video
MSE supports the WebM format with VP8 and VP9 video codecs and Vorbis audio codec. We’ll use the popular FFmpeg tool in order to encode the video properly, then we’ll have to remux it so we can retrieve the needed segments.
Here’s the command line I’ve been using all the time to convert a video to the WebM format with the VP9 video codec and the Vorbis audio codec:
$ ffmpeg -i movie.avi -c:v libvpx-vp9 -b:v 8000k -tile-columns 4 \
         -frame-parallel 1 -keyint_min 90 -g 90 -f webm -dash 1 \
         -c:a libvorbis -b:a 64K movie.webm
You should keep the -tile-columns and -frame-parallel flags as they are,
to enable multi-threaded encoding. The -keyint_min and -g flags define the
length of your media segments. They represent the “GOP” which stands for Group
Of Pictures.
Assuming that the video’s framerate is set to 30 frames per seconds, we’ll end up with media segments lasting 3 seconds each. That’s the only way to define each media segment length, since it’s the encoder’s job to split the video for the Media Source Extensions API.
Once the encoding process is finished, we need to generate the seeks table (which is similar to a table of contents) at the beginning of the file (since FFmpeg won’t go back and rewrite the beginning of the file after the process). It must be present inside the initialization segment, in order to let the player know the which media segment should be played at the time we are seeking.
For that, you have to grab and compile the sample_muxer tool and run the following command:
$ sample_muxer -i movie.webm -o movie_muxed.webm -output_cues 1 \
               -cues_before_clusters 1
Read the data
Our movie is now ready to be streamed over the web. It’s time to read the binary data inside and extract the segments.
Before that, you need to learn about your video’s file format. WebM files are similar to MKV files, they are both using the EBML format which is short for Extensible Binary Meta Language. The structure is a little like XML, except that this time, it’s not a human-readable format.
The following code shows how it would look like if it was:
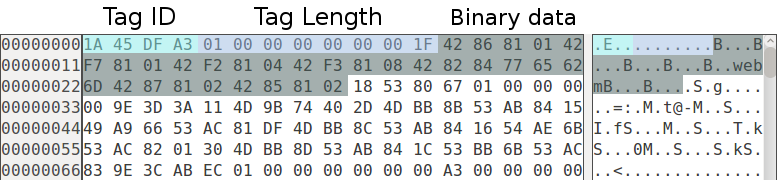
<!-- begin of the Initialization Segment -->
<Ebml offset="0" ebml-id="0x1A45DFA3" size="43" data-size="31">
  <Version offset="12" ebml-id="0x4286" size="4" data-size="1">1</Version>
  <ReadVersion offset="16" ebml-id="0x42F7" size="4" data-size="1">1</ReadVersion>
  <MaxIDLength offset="20" ebml-id="0x42F2" size="4" data-size="1">4</MaxIDLength>
  <MaxSizeLength offset="24" ebml-id="0x42F3" size="4" data-size="1">8</MaxSizeLength>
  <DocType offset="28" ebml-id="0x4282" size="7" data-size="4">webm</DocType>
  <DocTypeVersion offset="35" ebml-id="0x4287" size="4" data-size="1">2</DocTypeVersion>
  <DocTypeReadVersion offset="39" ebml-id="0x4285" size="4" data-size="1">2</DocTypeReadVersion>
</Ebml>
<Segment offset="43" ebml-id="0x18538067" size="1448" data-size="1436">
  ...
  <Void offset="124" ebml-id="0x6C" size="158" data-size="149">(149 bytes)</Void>
  <Info offset="282" ebml-id="0x1549A966" size="81" data-size="69">...</Info>
  <Tracks offset="363" ebml-id="0x1654AE6B" size="133" data-size="121">...</Tracks>
  <!-- end of the Initialization Segment -->

  <!-- begin of the first Media Segment -->
  <Cluster offset="700" ebml-id="0x1F43B675" size="766" data-size="754"></Cluster>
  <!-- end of the first Media Segment -->

  <!-- begin of the second Media Segment -->
  <Cluster offset="1466" ebml-id="0x1F43B675" size="766" data-size="754"></Cluster>
  <!-- end of the second Media Segment -->
  ...
</Ebml>
Reading the WebM Byte Stream Format is also necessary to understand which kind of data we should append to the Media Source buffer. The specification tells us that the Initialization Segment must start with an EBML element followed by a Segment element, which must include a Segment Information and Tracks element.
Instead of writing a full-featured parser, we can simply read as many bytes as necessary until we stumble upon a Cluster element header, which is the beginning of our first Media Segment.
Let’s make that process easy by opening the video file with a hexadecimal editor. GHex is my favourite one under Linux, HxD is also a good one under Windows and Hex Fiend should be more than enough for your Mac.
By reading the EBML specification, we can figure out that the first
bytes 1A 45 DF A3 represent the EBML tag. This tag is the beginning of our
Initialization Segment, the binary data is likely to be the same after every
encoding process, we shouldn’t bother parsing the tag’s contents and skip it
instead by moving 31 bytes forward as written in the tag’s length.

The next tag is the Segment tag, containing some valuable information for our video player, such as the video’s resolution, duration, bitrate and codec-related stuff. It also contains every Cluster tags, which happen to be our Media Segments until the very end of the file.
It would have been much easier if the Cluster tags could be located outside that Segment one, but this time, we will have to dig inside it and skip everything until we hit the first Cluster tag.
Reading EBML tags is not straightforward, here’s the function I’ve been using to parse every EBML tags and get their length. I’m currently finishing my EBML parser written in JavaScript with the Node.js framework, feel free to follow me on Twitter to get an update once it’s done.
Send the segments
Once we got everything we need, we can finally proceed to the most exciting part, which is seeing everything working perfectly. We just have to take the source code at the top of this blog post, and inject our Initialization Segment.
var initSegment = retrieveInitSegment();
var sourceBuffer;

function mediaSourceOpen() {
  var data = new Uint8Array(initSegment);
  var mimeType = 'video/webm; codecs="vorbis,vp9"';

  sourceBuffer = mediaSource.addSourceBuffer(mimeType);
  sourceBuffer.appendBuffer(data);
}
Depending on your web browser, the video player might be blank and show a black picture, waiting for the first Media Segment to be appended. But you can’t append one segment after another, otherwise, the Source Buffer will throw an error and the media player will crash.
The Source Buffer emits an event before and after updating, you have to wait
until it fires the updateend event before appending another Media Segment.
var mediaSegments = [];

function addMediaSegment(bytes) {
  mediaSegments.push(bytes);
}

function onUpdateEnd() {
  if (!mediaSegments.length) {
    return;
  }

  sourceBuffer.appendBuffer(mediaSegments.shift());
}

sourceBuffer.addEventListener('updateend', onUpdateEnd);
sourceBuffer.appendBuffer(initSegment);
What’s next
This article showed you how to stream a video with the HTML5 Media Player instead of the Adobe Flash Player. Now you have some basic tips to help you creating a video player that is similar to YouTube’s, I really hope they were useful to you.
You can improve it by handling the seeking behavior. You’ll have to retrieve the current time position, compare to each Cluster’s absolute time code, then inject the right Media Segment into the Source Buffer.
Or even better, you could implement an algorithm that would switch to different video resolutions and bitrates, depending to the current viewer’s downloading bandwidth. But that stuff is pretty complicated and depends on many factors. Rather than writing everything yourself, you should take a look at the Dash.js library for a cutting-edge MPEG DASH implementation.
Stay tuned for future articles about video streaming and other HTML5 & JavaScript tips. I’m also in fond of video game development so I will surely write about that topic later. Feel free to send me any feedback or suggestion via the comments or Twitter!
Leave a comment